Friday, April 30, 2010

House Tour: Kitchen!

Today, I am sharing my kitchen with you all. 

First, I would like to show you what it looked like after we first moved in...
Builder's beige.

I HATE the cabinets, but since this isn't a forever house, I
 don't feel inclined to do something just because I hate them...


Enter a happy shade of blue.
I painted this all by myself while Richard was deployed.
The color is called something like "Calm Sky"


Here is the kitchen up close and personal...
I put the Dancing Light along the back wall to draw your eye in from the from door.


Here is a table we adopted after being in the house for a year. 
We eat all our meals here... 

We found this piece long before we bought the table.
I adore it.
Solid wood. 
We got it at an antique shop in town.

I do have plans for the blank wall, I just haven't acted on my vision yet....

Stay tuned for that...

And the wood rectangle on the server is a pie board...one of the coolest Christmas gifts I received this year!
I like to look at it and I have no where to store it, so it lives atop the server.

I would also like to take this time to share my "pantry".
It is the oddly narrowly shaped cabinet that I typically decorate with my kid's paintings...


I was appaled when we moved in and saw this cabinet. 
What in the hell am I going to do with it?

Well it perfecly stores my griddle and grill and skillet...
And NesQuick!


And pasta and breadcrumbs and cereals seem to fit just fine.


Unfortunately, I couldn't do that with my canned goods.
I tried and I went crazy.
And I had no where else to put them because of lack of cabinet space.

So Richard installed these super cool drawers for me.

They were just wide enough to slide in and out easily.
The track screwed into the shelf. 

And we adjusted the shelf size for short and tall canned items.
This change actually changed my life.
Can you tell we eat a lot of pasta?  I have a ton of tomatoes and ready-made sauces.
Gotta buy it when it is onsale!
I also store all of our aprons in here! 
Meredith's little cupcake apron makes me smile everytime I see it!

Thanks for stopping by! 

Wednesday, April 28, 2010

House Tour: Entryway!

I am so excited that you came to visit!
Come on inside!

Once you step inside, you will be enveloped in a calming green.
Olympic's Dancing Light.
I adore it.
I LOVE green and somehow this color acts as a neutral.
We have used it along the hallway upstairs and down.
Also, along the back wall of the house to connect the living room and kitchen(open floor plan).

I am not excited about the entryway.
I want something beautiful to pull you in.
I am planning to frame photos of the kiddos to put there....
But I stuck this here a long time ago, and just never thought about it again.

I doubt you can read it, but this print was purchased
10 years ago during Beach Week after HS graduation.


The bench was spontaneous clearance find...
I had no clue when I bought it, where it would go, but I couldn't leave it in Lowe's.
(Did you know Lowe's sold accessories like this?  Neither did I, but only in large stores!)

The pillows were a clearance find way before I ever even chose the paint color.
I originally purchased them for the Master Bedroom, but they didn't match.

After painting the green, I realized they fit perfectly! 

Family photos and a montage of Meredith around 8 months greet you in the hallway...


And please freshen up before you come in!
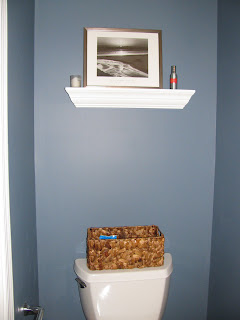
This was one of the rooms we did not paint. 
I can't quote the color name for you.

I despise it.  I think it is too dark for such a small room.
But, alas, it is not a priority for me at the moment...

What WAS a priority was covering up HUGE holes the previous owners left behind.
Since we didn't have the paint, we couldn't spackle them
(and they didn't have the decency to do so either!)

We measured and searched for a shelf that would mask the damage!
Target is where we found the white shelf.  

I know it looks awful high, but in leiu of painting, this was the best solution for us.
And I love this little basket! 
I (usually) store extra TP in there with the wipes.

And yes!  We do have extra TP.  

I am reminded of a little ditty I read a while ago...

Stop by tomorrow to continue our tour!

Tuesday, April 27, 2010

House Tour Postponed

I am so sorry!

I know I said I would continue with the house tour today, but blogger is giving me a fit!

Forgive me, and I will try again later!

Cheers!

Shed Stopper

Yesterday, I was determined to finish at least one of the three projects I am currently working on. 

I wrangled the kids out of the backyard to help me get some things out of our shed....
Which was stressful enough in itself. 

Little did I know, things would only get better.

I put the key into the lock of my shed and turned....

I had to encourage my littles to move out from their favorite spot, hanging onto each of my legs...so I could open the door.

Looking down, I ALMOST stepped into the entry way from the ramp, when I stopped dead in my tracks.

A small white and green head poked around the door.  I instantly screamed at the kids to get down.  I freaked out beyond necessary - which I forgot to NOT do.

I try to keep it low key for Lucas because I don't want him to be afraid of thing, but sometimes I forget.

Regardless of that, there was a freaking SNAKE in my shed.

I immediately call Richard - thinking he could solve my problem even though he would not be home for another several hours.

And he did exactly what I figured...he laughed.

"Are you sure it is a snake?"

No dummie.  You are right, it must be a worm, that I mistakenly thought was a snake.

"Yes Honey!  It was a freaking snake!"

"It WAS a snake?  Where is it now?" 

"I don't know, I came back from getting the phone and it was gone!"

"Well, he is probably gone.  He isn't going to hurt you!" 

"You mean he is hiding in the shed in the wood I wanted to pull out?!  I am not going in there!" 

"Okay, well just shut the door and I will look for him when I come home!" 

Why I needed to call him and let him tell me to not go in the shed - when I wasn't going in the shed anyways, is beyond me.

But it made me feel better, and I am sure it gave him something interesting to laugh about during his last class...not that the Regulation of Vice isn't interesting....

Regardless,  I cannot finish my projects because I am scared.

Scared of a little critter that is 1/64 my size.

And for all anyone knows, may have been a giant worm. 

Monday, April 26, 2010

House Tour: Front Porch!


But before you come inside, I want to show you around front...

The accessories are all gifts from family...

Between the snow and the deer, this is actually the best looking plant outside the house right now...
Sad isn't it?!


If the pollen wasn't so terrible, I would join you for a talk out front in our Adirondack Chairs.
Richard didn't believe me when I told him how comfy these wooden chairs were.
Once he said, he agreed that we had to have them!


Or stop by after dinner and we can swing in rhythm with the breeze...
This swing was a housewarming gift from Richard's parents...
It is quite amazing and we adore it, even in the coldest days of winter.


I hope you stop by tomorrow as we step inside! 

Saturday, April 24, 2010

"How I Met My House!"

I missed a party that was called "How I Met My House!" 
I like the idea of sharing the story of such...

So rewind 2 years - to Feburary 2008.  I was 34 weeks pregnant with my daughter and my husband was in Army limbo land as to what path we were to explore next....law school?  deployment? 

We had been waiting for a LONG time and finally word came that my husband was going to deploy to Iraq come May.  He would have to defer law school. 

We made the decision to move our family across country to be closer to the law school before he left for the deployment.  I didn't want to move alone (or with 2 littles alone, rather)....

In one weeks time, we set up movers, packed up our home, and traveled across the country to Virginia.  We stayed with family while we made preparations to find a place to call our own. 

My husband wanted to purchase again (We purchased our home in OK). 

And based on the specifics of what we wanted, a realtor took us on a whirlwind tour of 20 homes in one day. 

After an exhausting day, we ranked the houses based upon our notes and placed our first bid. 
I still think about this house, but it was on the high end of our price range.
We couldn't go higher than we offered, and the bid was rejected.

The second house we bid on was not vacant.  And although the seller had noted they would leave quickly, they were not willing to leave by the end of the month.  Strike 2.

The third house we placed a bid on was not one of our favorites, but it seemed like the next best option. 
Our bid was countered and we accepted.

With time NOT on our side:
we opted to ignore the fact that this house had NO storage, but was 2X the size of our home in OK.
we opted for a two week closing...
we opted to sign a decorators contract, where we could move our things in before closing.  

We signed our contract on Wednesday and on Friday the movers were arriving with our things. 
Everything was a whirlwind!  But everything lined up perfectly so everything would fall into place. 

I am forever grateful for that, because I had bigger things to worry about ---
like find an OB who would accept a 36 week pregnant woman....
like getting an address so insurance would process the proper paper work.
like popping out this baby BEFORE the due date so my husband could meet her before he deployed....
like setting up a home before my life spun out of control! 

So this is the place we now call our own! 


And in order to not neglect my blog....
in the coming days I will be giving you a insider's tour of the rest of the house! 
Look forward to seeing you then!

Tuesday, April 20, 2010

Fairy Wand

Every little girl wants to be a fairy princess.
And what princess is complete without a fairy wand??

I wanted to find Meredith a fairy wand for some time now.

After looking through all the tulle wands on etsy, I wondered what one would look like if I used ribbon. 

I have heard how easy it is to make korker bows in the oven, so I decided to give it a try.
I looked up directions and was ready to go!

***************
I purchased wooden dowels at my craft store for about $2.
I also needed paint, a brush, floral wire and clothes pins.

For the ribbons, I chose various shades and widths and textures of the color scheme I wanted.
I had 14 different ribbon spools.


You will need Fray Check or a lighter to singe the edges of the ribbon so they won't fray. 
You will do this AFTER you have baked them in the oven because the fray check is flammable.
(I opted not to use the fray check, because it is messy and I am an expert at the lighter method!)


With clothespins, I pinned the edge of the ribbon to the dowel. 
Spiral wrap the ribbon around the dowel and clip on the other end with a second clothes pin.

The tighter you wrap the ribbon, the tighter the spiral will be!


In a preheated 250* oven, bake the ribbon on a cookie sheet for 20 minutes.
After 20 minutes, remove your ribbon from the dowels and cut in half!

I ended up with this.
I also cut four colors of wider ribbon to hang straight in the wand.
This was done twice.

Meanwhile, you need to take your paint of choice. 
I chose an acrylic silver glitter paint, that required WAY too many coats!
I painted my dowels with the paint, using styrofoam to hold them upright.


Once the dowels are dry, take your drill and the smallest drill bit you have and make a hole approximately 1/2 inch from the top of the dowel. 

Then it is time to tie the piece of the wand that makes the magic! 
Once you have placed your ribbon in the order you would like the colors to occur...

You need to cut a piece of thin ribbon LONGER than you will think you need. 


I spread out my large, flat ribbon to ensure that it wouldn't lay flat on top of each other. 


then I gathered the curled ribbons and placed them on top...

With a second pair of hands, I held everything in place, while the other hands tied the ribbon in several tight knots.


The finished piece will look like this. 

After a bit of fluffing, take a 4 inch piece of floral wire and thread it through the hole of the dowel. 
Wrap the wire around itself, the dowel and through the ribbon you used to secure the "magic" part of the wand.

Sorry for the lack of photos on this step!

The final piece will look like this!


Your child will be more than happy to cast evil spells on her brother with such a cool wand! 

I'd love to see photos if you make one!

Sunday, April 18, 2010

Playing with Ribbons...

I have a list of things "to do" that keeps steadily growing....

And with that list, is a pile of half-finished projects! 
Projects that I lay in bed thinking about each night, being too exhausted to complete them!

I will show you what I have finished though! 

Meredith is super excited about her skirt! 


I followed Disney's 20 minute skirt plans from Ruffles and Stuff and modified them to fit my itty bitty.

I also added pink ribbon for some extra flair...


My next project is a Fairy Wand!
I will be posting how I did this later this week! 


Until then, I need to work on folding the laundry that is piled on my bed!

Thursday, April 15, 2010

Pom Poms and Punch

I am somewhat of a collector of things. 

I found this Tissue Paper Pom-Pom Kit on super clearance shortly after Meredith was born (2 years ago people). 

I knew then, that it would be a great thing to incorporate into a party for her one day! 
So I took it home.

You can read about them on Martha Stewart's website HERE.

I had even picked up some lavender tissue paper to use as well. 

Unfortunately, I didn't begin working on them until around midnight, before


The "fluffing" took A LOT longer than I anticipated...
I have serious perfection issues, so I didn't want to begin making another one...

So this is the only one I accomplished...


And it looked nice until it fell..and a little child began running around with it...
and well tissue paper balls and children spell disaster.

But on to other news, we had PINK PUNCH. 
In trying to find a recipe, I transposed ingredients across several recipes and ended up not buying the "right" ingredients. 

(I am terrible about taking lists to the store). 

Our test punch ended up being liked by all and so you get the recipe!

Pink Princess Punch!
1 2L Cherry 7-Up
1 qt Raspberry Sherbert

Place Sherbert in a punch bowl.  Cover with 7-Up! 
Let the flavors marry for about 20 minutes before serving. 

Enjoy!

LinkWithin

Related Posts with Thumbnails